
Status : Completed
Tags: opencv python arduino mediapipe nodemcu
To create a robot that can decrypt the gestures and move as we command through our gestures.
python
opencv
arduino
nodemcu
mediapipe
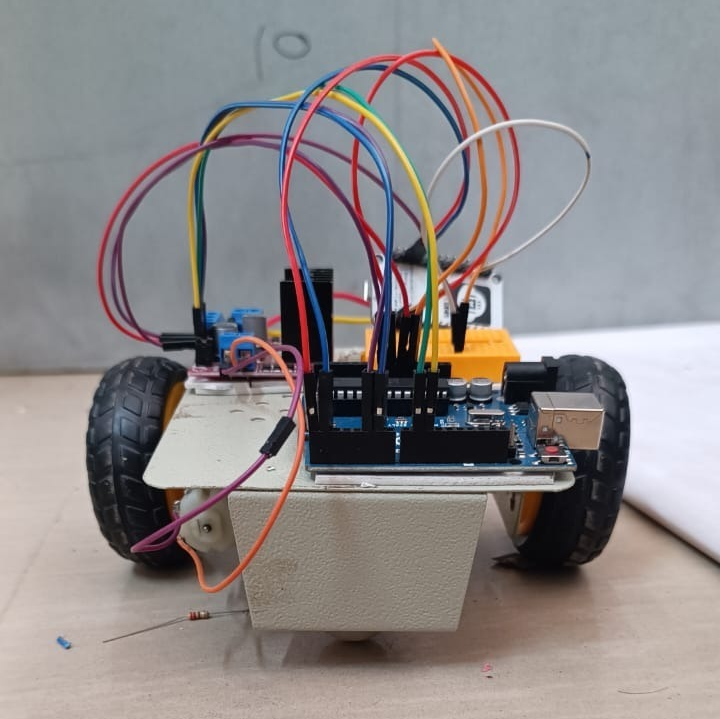
We aimed to create a gesture-controlled bot. This bot takes gestures from our hands via camera and moves according to the gestures. In this project, we take gestures from the camera, and the output is then transmitted to the Arduino UNO microcontroller over the wifi using Node MCU. As per the given input, the bot moves by Arduino. This project is based on the application of the Internet of Things.
|
Name |
Quantity |
|
Chassis |
1 |
|
DC Motor |
2 |
|
Wheels |
2 |
|
Arduino UNO |
1 |
|
L298A motor driver |
1 |
|
NodeMCU |
1 |
|
BreadBoard |
1 |
|
Castor wheel |
1 |
|
Jumper Wires |
9-10 |
We are using Python’s OpenCV library to capture the gesture; further media pipe is being used to process those gestures according to relations based on the geometry of the hand.
Then this output is sent to our microcontroller, that is, Arduino UNO here, using the Node MCU module over the wifi, using the concept of data transfer in the Internet of things. After getting the gesture, Arduino will instruct the bot to have a movement accordingly.
L298A motor driver-
The L298A is an integrated dual H-bridge motor driver circuit that controls two DC motors or a single stepper motor. It can handle a wide range of motor voltages and currents, up to 46V and 2A per channel.
This motor driver is connected to an Arduino, and it is programmed to handle the motor's speed and direction of rotation, which in turn provides a variety of motions.
Arduino UNO-
The Arduino Uno is a popular open-source microcontroller board that provides an easy-to-use platform for building digital devices and interactive objects. Arduino boards come in various models as per the requirements. Here we have used Arduino UNO. Arduino takes the serial from NodeMCU, and as per the loaded code, it acts on the serial. For uploading code, we use Arduino IDE. All the circuit diagrams of Arduino are provided below.
Node MCU-
We are using the Node MCU ESP8266 module here.ESP8266 is a Wifi module allowing us to transmit data to a microcontroller. It’s easy to use as we can code it over Arduino IDE. We just have to install a library named ESP8266 in the Arduino IDE. We create a laptop as a server, and NodeMCU accesses the output from that server over Wifi; both the laptop and NodeMCU are needed to be connected over the same Wifi.
Further, NodeMCU was connected to Arduino as per the circuit diagram.
For the NodeMCU-Arduino connection, we have-
We have connected Rx of Arduino to Tx of Node MCU and vice versa. Then connected, the Ground of Arduino to the Ground of NodeMCU and the Input voltage to 5 Volts.
The motor driver and Arduino circuit diagram are as follows-
OpenCV is a library in Python, and we used this on the camera. Then this video is processed frame by frame. ’cv2.Videocapture’ is the command for opening the camera.
Mediapipe comes into action in the next step. Mediapipe is a library that has included models for face detection, facial landmark detection, hand tracking, object detection, and even human pose estimation. We use a hand tracking function, in this mediapipe breaks our hand into 20 different points or we can say landmarks.
Direction- Direction is set based on the relative distance of the middle fingertip and wrist. If the middle finger is on the left of the wrist, the bot will move left, and if it is on the right side, it will be on the right side. For a specific range, it will move forward and reverse direction. For the reverse direction, we have set that after a fixed distance of thumb, and the bot will move in the reverse direction.
In this, we can see the person has tilted his hands in the right direction, and hence the screen is showing Right.
Velocity-For Velocity, we have set that when we tilt our hand to the right, the difference between the x-coordinates of the 0th and 8th landmarks increases. Therefore, to determine the velocity to the right, we can find the difference in x-coordinates between these two landmarks.
In code, we have tried to create NodeMCU as a local host server. This NodeMCU connects with our wifi and esp runs the desired code and then returns the result as an HTTP request. Finally, python reads that returned data as an HTTP request and grabs that variable from it. With this, esp can return strings, data, and arrays.
Connect the NodeMCU to your wifi, get its Local IP address, and paste it into your browser. Make sure your pc is also connected to the same wifi as NodeMCU.
After this, connect it to Arduino's Tx and Rx pin, as shown in the diagram.
First, we define the pins through which we connect the motor driver. Then start serial communication at baud rate 9600. We have created if-else statements for the movement of the bot.
https://github.com/roboclub-mnnit/Gesture_controlled_car-2022-23-Project.git
https://www.youtube.com/watch?v=uveo1fg9FS4
These projects can be used in various fields as per the requirement, some of them are as follows:
We faced various problems and then came up with a few solutions as follows:
Python Resources:
OpenCV tutorials:
Arduino resources
L298n Motor Driver Tutorial:
ESP to Python Resource
|
Name |
Branch |
Registration No. |
|
Shubham Verma |
Mechanical Engineering |
20213132 |
|
Sumit Mishra |
Mechanical Engineering |
20213065 |


